How to stream your event using Quicket Hosted Streaming
There are many different options you can use to provide content and stream an event, such as YouTube, Vimeo or Facebook. But if you want to ensure your content stays between just you and your ticket buyers, you can use Quicket Hosted Streaming and keep your ticketing and streaming all on one platform.
Note that you'll need a video encoder to use Quicket Hosted Streaming. An encoder simply sends your camera signal to our servers, which we then send to the viewers of your Quicket streaming page. We recommend using OBS Studio which is a free and open source option. We provide some basic help below for getting set up in OBS, but you can find more details (and download the software) from the OBS Studio website here. Click here to find the encoder configuration settings required to use Quicket Hosted Streaming.
Note that you'll need a video encoder to use Quicket Hosted Streaming. An encoder simply sends your camera signal to our servers, which we then send to the viewers of your Quicket streaming page. We recommend using OBS Studio which is a free and open source option. We provide some basic help below for getting set up in OBS, but you can find more details (and download the software) from the OBS Studio website here. Click here to find the encoder configuration settings required to use Quicket Hosted Streaming.
Setup
After you've created your event, start by heading to your dashboard and go to Event Page >> Online content.
Click 'Add online content' to start setting up a new stream for your event. A modal will appear where you can choose the way to provide the type of content you have - 'Provide a link', 'Quicket Hosted Streaming' and 'Upload a video file'. Select 'Use Quicket Hosted Streaming.' Be sure to read the details regarding pricing then click the button to Use Quicket Hosted Streaming.
You'll need to provide a few details for us on the form that follows to set up your stream:
Stream name: This will be displayed on your streaming page so viewers know which stream they are watching. This can also help you distinguish between streams on your management page if you have more than one stream.
Description: You can optionally provide some details here about your event; this will appear on the streaming page.
Hide until: You can optionally select a date & time to reveal this stream before it goes live on your streaming page. If a date & time is selected, this stream will be hidden until that date.
Hide after: You can optionally select a date & time to hide this stream after it goes live on your streaming page. If a date & time is selected, this stream will be hidden after that date.
Hide after: You can optionally select a date & time to hide this stream after it goes live on your streaming page. If a date & time is selected, this stream will be hidden after that date.
Upload thumbnail image: If you have more than one stream, this thumbnail image will appear in your list of streams where viewers can select which stream to watch. If no thumbnail image is uploaded, we'll display a default Quicket image.
Convert my stream to Video on Demand after it ends: If ON, your stream will be converted to a video file after it ends. Your video will be ready for viewing 12 hours after your original stream ends. Please find more information about using Video on Demand here.
Only allow ticket holders to view this stream: If you're using Quicket Streaming, then you likely want to keep your content just between you and your guests. If this is the case, keep this setting ON, and just below this select the ticket types should have access to the stream. Only people who book the ticket types selected will be able to view this stream. NB: If this setting is turned OFF, then anyone with the link to this streaming page will be able to view its content.
Click 'Save stream' once you've filled in all of your details.
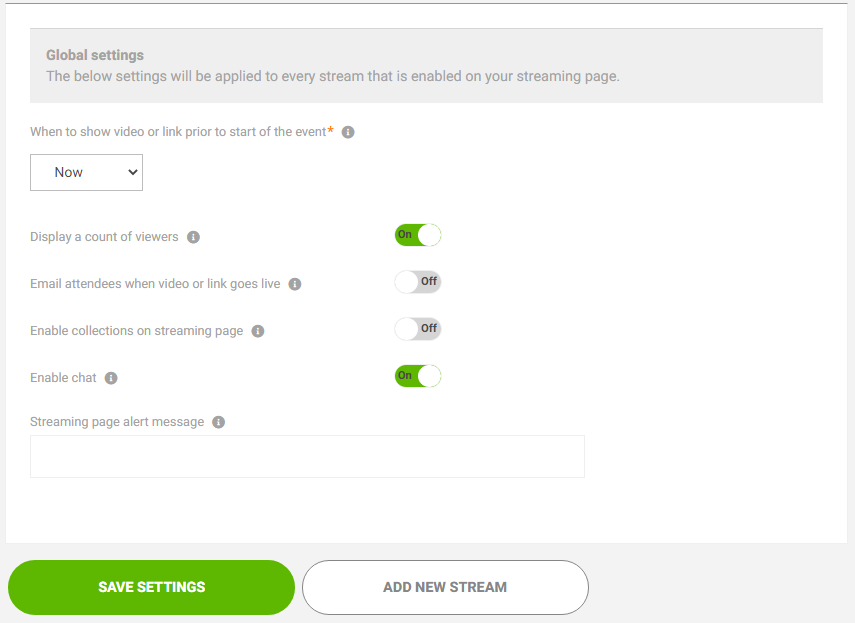
Global settings
After your stream has been added, you should notice some Global Settings appear on your management page. Feel free to use the default settings we've provided, or update them as needed. Note that if you need to change any of these settings during your stream, they will update automatically on your streaming page for viewers to see. E.g., if you add a streaming page alert message, viewers will not need to reload the streaming page in order to see it.
When to show video or link prior to start of the event: if you have some pre-show content you'd like to share before the event starts, this is where you can set the amount of time between the stream opening and the event starting.
Display a count of viewers: If ON, viewers will be able to see how many others are watching the streams for your event.
Email attendees when video or link goes live: We'll send reminder emails to each ticket holder before the event starts, but you can slide this ON if you'd also like to send them an email when the event opens.
Enable collections on streaming page: If ON, attendees can very quickly and easily make donations directly from your streaming page during the event. Click here for more information about collections.
Enable chat: If ON, attendees will be able to talk to each other (and you and your moderators) during the event. Note that the same chat will be displayed for each stream in your event if you have more than one.
Streaming page alert message: If you need to relay a message to viewers, e.g. if the stream is running a few minutes behind, simply type in your message here and it will automatically appear for viewers to see. You can remove it when you need to, and it will also disappear without viewers having to reload the streaming page.
Be sure to click 'Save settings' once you're happy with your settings.
Encoder details
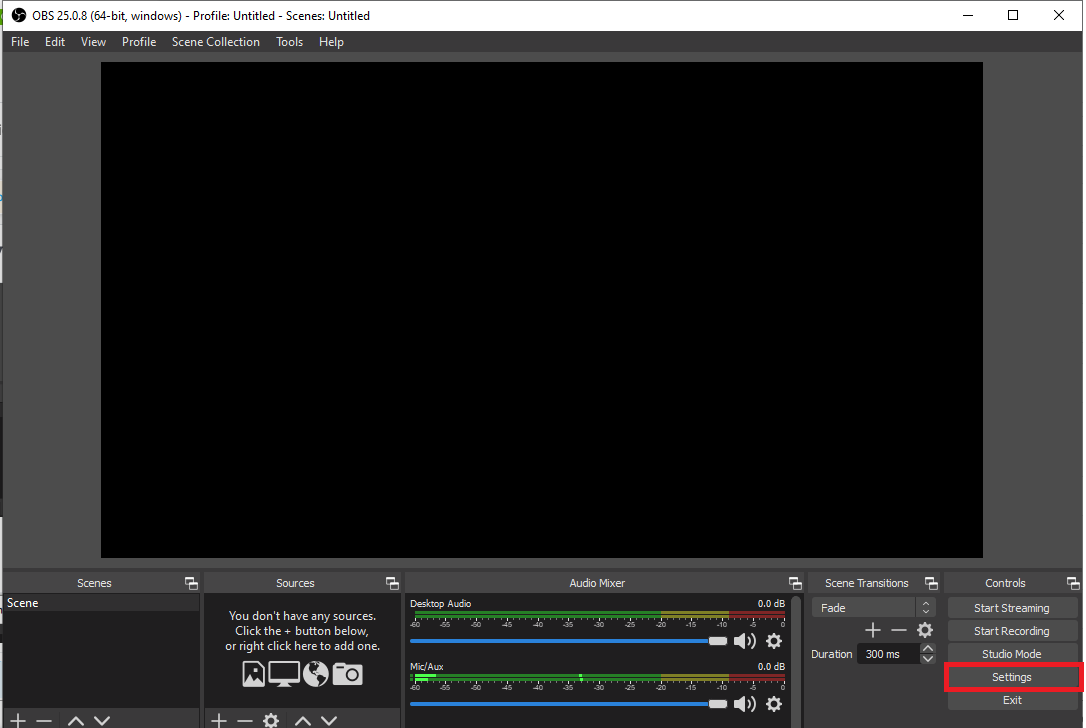
Once you click Save Stream, we'll send you an email with the details you'll need to plug into your encoder to stream through Quicket. You can also find these by clicking the cog icon under Actions next to your stream on the management page. An encoder sends your camera signal to our servers which then send it to the viewers on your Quicket streaming page. We find that OBS Studio is a great free and open source option for your encoder; you can find more details about OBS, and download the software on their website here.
NB: If at any time you turn off Quicket Streaming and choose to provide a link to your content instead, the streaming details we gave you will become invalid. If you choose later to reactivate Quicket Streaming, your streaming details will change - you will not be able to use the previous details we provided.
Side note: We highly, highly recommend testing out and getting familiar with OBS Studio (or whichever encoder you may choose) before event day. You want to feel comfortable and confident using the technology before your event goes live. There's a great OBS master class playlist on YouTube here. If you don't have time for the full class, you can pick and choose your lessons based on your specific needs, but at the very least Lesson 102 'User Interface Tour & Walkthrough' will be helpful.
Once in Settings, select Stream from the left side menu. For Service, select Custom.
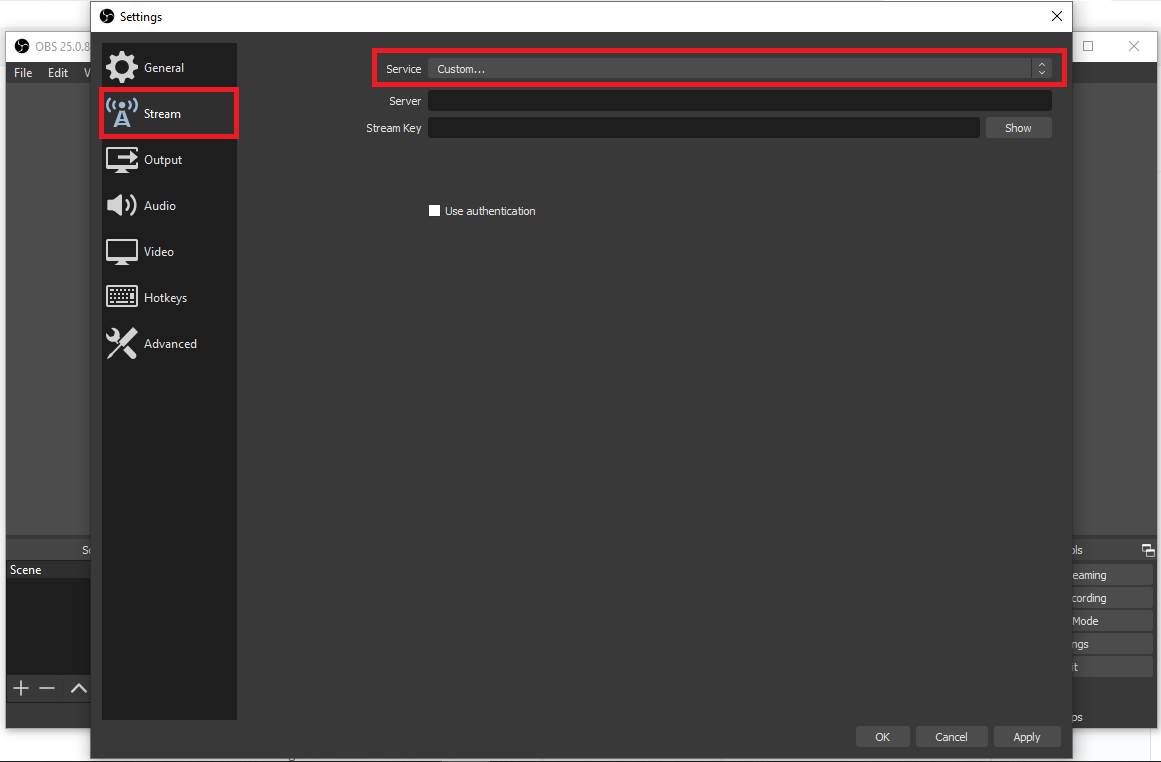
The streaming details we provided you can be entered here as follows:
Server: server
Stream Key: key
You do not need to tick the box 'Use authentication'. Click OK or Apply when finished.
Note that other encoders may use differently terminology for the details you need to provide, but you will need the same streaming details for any encoder used.
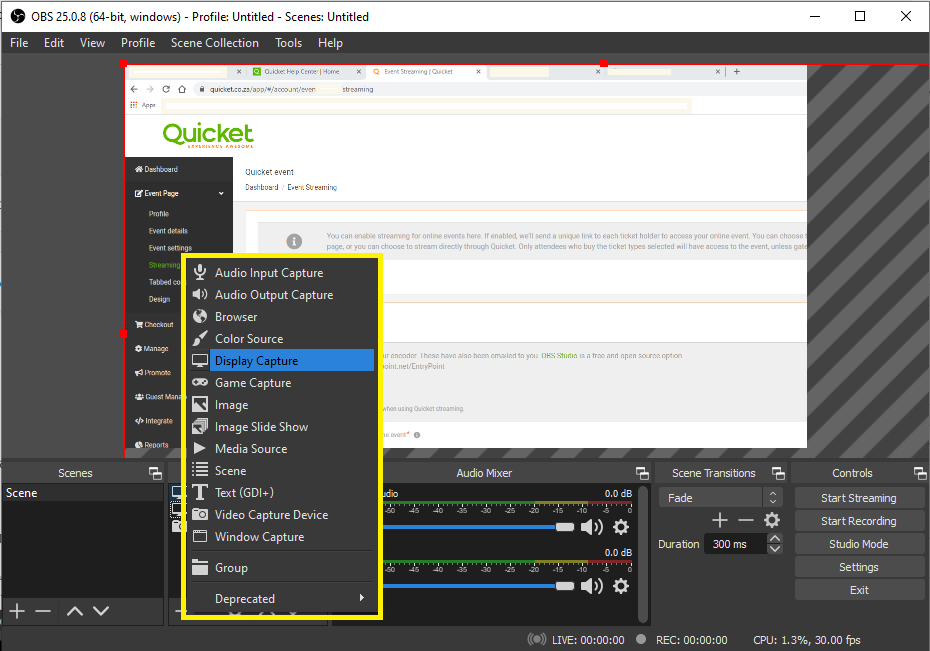
We highly recommend playing around a bit to get familiar with OBS before starting your event stream. So a quick way to get started - you'll need to choose a source. Click the + symbol inside of the Sources box or right click to choose your source.
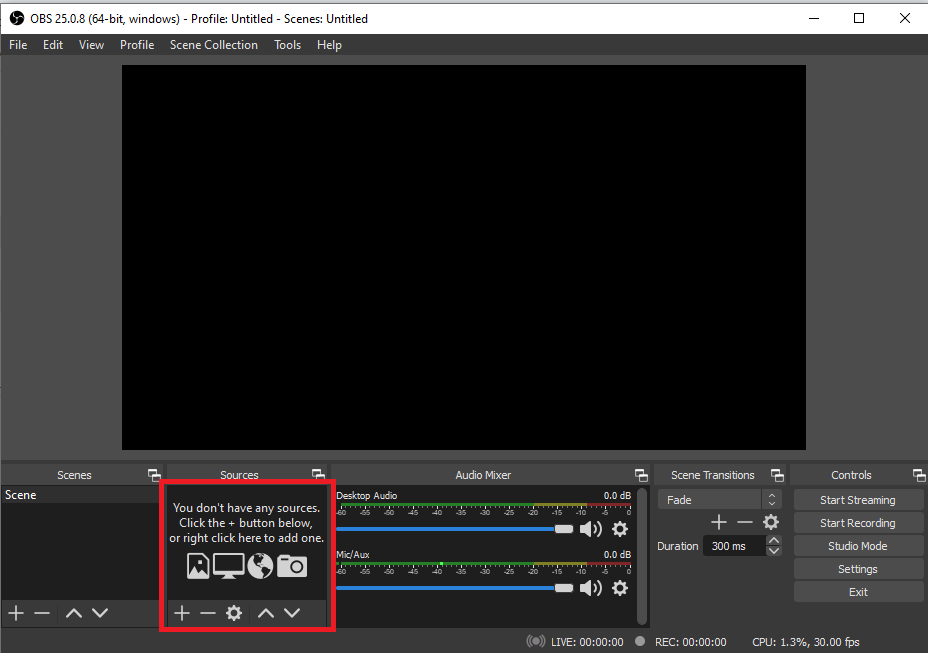
The source you choose dictates where your content is coming from. E.g. if you'll be streaming some sort of tutorial where you need to share your screen with guests, you would choose the option Display Capture.
When event day comes around, and you're ready to stream you'd click Start Streaming on bottom right. Or if you're recording, simply click Start Recording.
Remember that you can find more detailed help on the OBS website here.
NB: If at any time you turn off Quicket Streaming and choose to provide a link to your content instead, the streaming details we gave you will become invalid. If you choose later to reactivate Quicket Streaming, your streaming details will change - you will not be able to use the previous details we provided.
Getting started in OBS
If you choose to use OBS, once you've downloaded it, you'll need to go through a few quick configuration steps. When you get to the section Stream Information, you'll need to select Custom to provide your streaming details. You can also add or edit these details by clicking Settings in the bottom right corner.Side note: We highly, highly recommend testing out and getting familiar with OBS Studio (or whichever encoder you may choose) before event day. You want to feel comfortable and confident using the technology before your event goes live. There's a great OBS master class playlist on YouTube here. If you don't have time for the full class, you can pick and choose your lessons based on your specific needs, but at the very least Lesson 102 'User Interface Tour & Walkthrough' will be helpful.
Once in Settings, select Stream from the left side menu. For Service, select Custom.
The streaming details we provided you can be entered here as follows:
Server: server
Stream Key: key
You do not need to tick the box 'Use authentication'. Click OK or Apply when finished.
Note that other encoders may use differently terminology for the details you need to provide, but you will need the same streaming details for any encoder used.
We highly recommend playing around a bit to get familiar with OBS before starting your event stream. So a quick way to get started - you'll need to choose a source. Click the + symbol inside of the Sources box or right click to choose your source.
The source you choose dictates where your content is coming from. E.g. if you'll be streaming some sort of tutorial where you need to share your screen with guests, you would choose the option Display Capture.
When event day comes around, and you're ready to stream you'd click Start Streaming on bottom right. Or if you're recording, simply click Start Recording.
Remember that you can find more detailed help on the OBS website here.
Fees
Please note the following fees in ZAR for using Quicket Hosted Streaming:- R100 / hour of content broadcast
- R2 / hour of content watched by a viewer (e.g. 10 people watching 10 minutes is 100 minutes of content watched)
- R5 / hour of video stored per month (if you choose to have your stream converted to Video on Demand)
Prices above are ex. VAT and are billed pro rata per minute. These fees will be deducted from your event payout within 3 working days of your event end date.
Please don't hesitate to email us on support@quicket.co.za or phone us on +27 21 424 9308 if you have any questions about streaming your event.
Related Articles
Streaming FAQ
How do I get started streaming? First, it's best to decide which platform you want to use to stream your content. There are many options - YouTube, Vimeo, Facebook, and now Quicket. Platforms like YouTube and Vimeo are great if you'd like to have a ...How do I access an online event stream?
If you booked tickets to an event that uses Quicket's streaming platform, all you need is your unique 5-digit code to access the stream. There are several places you can find this if your booking was successful. You'll know that an event is using ...Encoder settings for Quicket Hosted Streaming
Please note some of these may already be set by default, depending on the encoder you are using. These are a recommendation of where you can start, but we do recommend playing around with your settings to see what works best for your content. Common ...How to enable streaming for your online event
While creating your event, after selecting your venue or selecting that your event has no venue, you'll need to specify whether your event has online content. This could be a livestream, a webinar, some previously recorded content or even a PDF. If ...How to set up a stream with multiple people connecting in remotely
Many streaming services and encoders offer a way to include multiple people in a stream from different locations, but please note that the below instructions apply to organisers using Quicket Hosted Streaming with OBS Studio as your encoder. Perhaps ...