How to add, edit and delete ticket types
To complete the event creation form, you need to create at least one ticket type, but you can add more ticket types, edit your current ticket types or delete ticket types from your event dashboard at any time after your event is created.
Start by logging into your Quicket account, and go to Organiser Hub -> Manage Events then click on the name of your event. From the event dashboard go to Checkout then Ticket Types.
Add ticket types
You'll see all of the ticket types you've already created. Choose whether you'll be adding a paid ticket type to sell for money, adding a free ticket type or collecting donations.
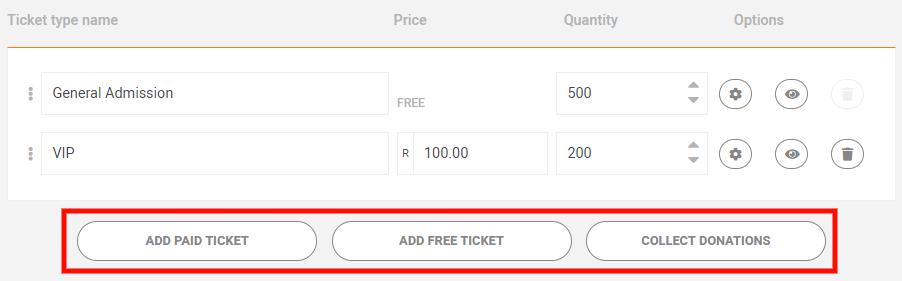
You'll need to provide a name for the ticket type, price (if a paid ticket type) and quantity (the maximum amount which can be issued; not applicable for donations).
You'll need to provide a name for the ticket type, price (if a paid ticket type) and quantity (the maximum amount which can be issued; not applicable for donations).
Some default settings will be applied to the ticket type you've created, but you can edit these by clicking the cog icon under Options. See the next section below for more help editing your ticket types.
If you're happy with the default settings for the ticket types you've added, just scroll down the page and click Save Event Tickets.
Edit ticket types
If you're happy with the default settings for the ticket types you've added, just scroll down the page and click Save Event Tickets.
Edit ticket types
From the moment your event is created, whether the event is in draft mode or is already live, you're able to make edits to your ticket types. The only exception is if someone has already booked a ticket, you will not able to change the price of that ticket type. The price of any ticket types which have already been booked will appear greyed out so that you know it cannot be changed.
When a ticket type is created, we apply some default settings for that ticket. You can edit these settings by clicking the cog icon under Options.
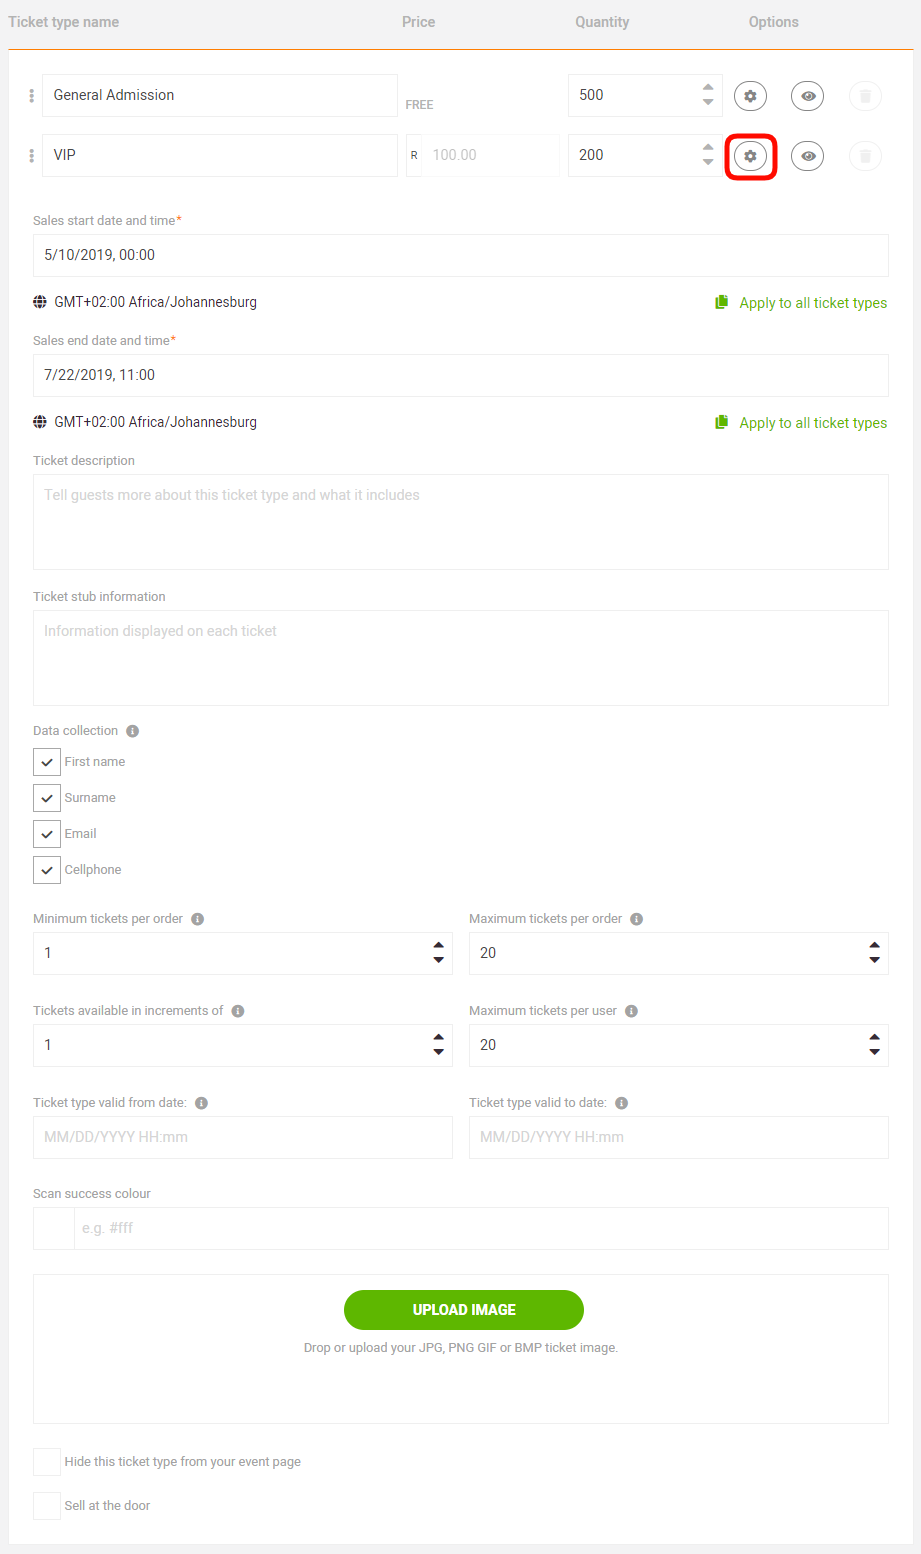
Sales start date & time: select the date and time that you want to start selling this ticket type.
Sales end date & time: select the date and time that you want end sales for this ticket type.
Ticket description: the details of your ticket type. What you enter here appears as a pop-up when guests hover over the information (i) icon next to the ticket name on your event page.
Ticket stub information: enter your terms and conditions, age restrictions, and other event information here. Only the first 500 characters will be shown on the ticket.
Data collection: these are the details that Quicket collects by default. You can add more details to collect from the Collect Info section in your dashboard. You can find more help on that here.
Minimum tickets per order: the minimum number of tickets that can be purchased in a single order. Guests will not be able to purchase less than this amount.
Maximum tickets per order: the maximum number of tickets that can be purchased in a single order. Guests will not be able to purchase more than this amount.
Tickets available in increments of: if you have an event where guests can only purchase tickets in groups of 2 or 3, etc, you'll want to specify that here. Note that you'll want to still keep the ticket price per single ticket , otherwise guests may be over-charged.
Maximum tickets per user: the maximum number of tickets that a user can book regardless of whether they have one order or multiple orders. For example, if set to 10, users can make one booking of 10 tickets, or two bookings of 5 tickets but will not be able to buy more than 10 tickets total.
Ticket type valid from date: if this ticket type is only allowed to be scanned in during a specific period of time at your event, enter the start date & time of that period here.
Ticket type valid to date: if this ticket type is only allowed to be scanned in during a specific period of time at your event, enter the end date & time of that period here.
Scan success colour: when tickets are successfully scanned in at the door, they will flash the colour you choose from this menu. (This is great if you need door staff to easily and quickly know when a certain ticket type holder checks in, e.g. VIP or sponsors).
Upload image: If you have artwork for your event, you can upload your own ticket design for your ticket types. The image uploaded will appear on the ticket just below the ticket information, barcode and QR code.
Hide this ticket from your event page: check the box next to this field if you don't want this ticket type to be visible on your event page. You can create access codes for certain guests to be access hidden tickets. More information on creating access & discount codes here.
Sell at the door: check the box next to this field if you want this ticket type to appear for your Door Sales at your event. Click here for help with door sales.
Be sure to click the button Save Event Tickets at the bottom of the page to save all changes made.
Delete ticket types
When a ticket type is created, we apply some default settings for that ticket. You can edit these settings by clicking the cog icon under Options.
Sales start date & time: select the date and time that you want to start selling this ticket type.
Sales end date & time: select the date and time that you want end sales for this ticket type.
Ticket description: the details of your ticket type. What you enter here appears as a pop-up when guests hover over the information (i) icon next to the ticket name on your event page.
Ticket stub information: enter your terms and conditions, age restrictions, and other event information here. Only the first 500 characters will be shown on the ticket.
Data collection: these are the details that Quicket collects by default. You can add more details to collect from the Collect Info section in your dashboard. You can find more help on that here.
Minimum tickets per order: the minimum number of tickets that can be purchased in a single order. Guests will not be able to purchase less than this amount.
Maximum tickets per order: the maximum number of tickets that can be purchased in a single order. Guests will not be able to purchase more than this amount.
Tickets available in increments of: if you have an event where guests can only purchase tickets in groups of 2 or 3, etc, you'll want to specify that here. Note that you'll want to still keep the ticket price per single ticket , otherwise guests may be over-charged.
Maximum tickets per user: the maximum number of tickets that a user can book regardless of whether they have one order or multiple orders. For example, if set to 10, users can make one booking of 10 tickets, or two bookings of 5 tickets but will not be able to buy more than 10 tickets total.
Ticket type valid from date: if this ticket type is only allowed to be scanned in during a specific period of time at your event, enter the start date & time of that period here.
Ticket type valid to date: if this ticket type is only allowed to be scanned in during a specific period of time at your event, enter the end date & time of that period here.
Scan success colour: when tickets are successfully scanned in at the door, they will flash the colour you choose from this menu. (This is great if you need door staff to easily and quickly know when a certain ticket type holder checks in, e.g. VIP or sponsors).
Upload image: If you have artwork for your event, you can upload your own ticket design for your ticket types. The image uploaded will appear on the ticket just below the ticket information, barcode and QR code.
Hide this ticket from your event page: check the box next to this field if you don't want this ticket type to be visible on your event page. You can create access codes for certain guests to be access hidden tickets. More information on creating access & discount codes here.
Sell at the door: check the box next to this field if you want this ticket type to appear for your Door Sales at your event. Click here for help with door sales.
Be sure to click the button Save Event Tickets at the bottom of the page to save all changes made.
Delete ticket types
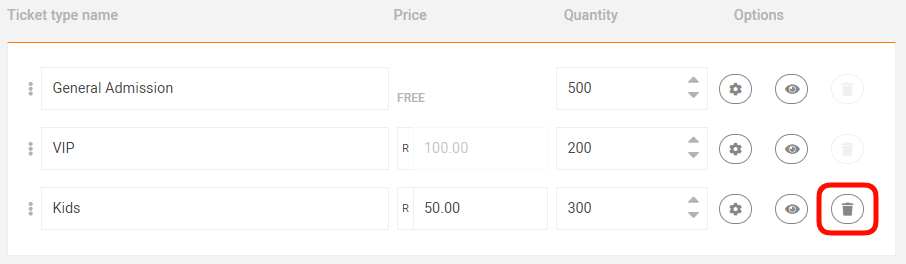
You can delete ticket types from your event as long as no one has already ordered or is currently placing an order with for ticket type. Simply click the bin icon under Options.
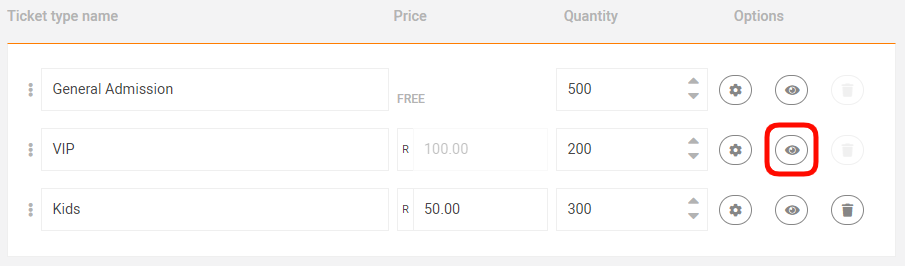
If someone has booked the ticket type you want to delete, you can still hide the ticket type so that no one else can see it available on your event page. Simply click the eye icon under Options.
If someone has booked the ticket type you want to delete, you can still hide the ticket type so that no one else can see it available on your event page. Simply click the eye icon under Options.
Be sure to click the button Save Event Tickets at the bottom of the page to save all changes made.
Related Articles
Can I edit my ticket details more than once?
The short answer is no. Ticket edits for AfrikaBurn are only meant to be used in a case such as you made a typo in your details at checkout and now need a quick fix. Ticket edits are not meant to be used if you are giving a ticket to someone else and ...How to update your default ticket type settings
You're creating or managing the tickets for your event, and need to set your purchase limits, sales dates and ticket descriptions. You'll start creating your ticket types in Step 3 of event creation, but you can always edit these and add more ticket ...Using Ticket Groups to categorise and organise your ticket types
Ticket groups are a way of grouping similar sets of ticket types together under a common section. The group is displayed to ticket buyers and can be collapsed or expanded to show the ticket types that belong to that group. Start by logging into your ...Setting your event capacity and ticket quantities
It's important to make sure you don't oversell your event, and we have a couple ways to ensure that doesn't happen. While creating your event (and throughout the span of your event), you have the opportunity to set a maximum quantity available for ...How to add event artwork to your ticket design
You can add a custom design to your tickets by simply uploading your event artwork as a JPG or PNG image file. The image uploaded will appear on the ticket just below the ticket information, barcode and QR code. To add a design to all of your ticket ...