Using Ticket Groups to categorise and organise your ticket types
Ticket groups are a way of grouping similar sets of ticket types together under a common section. The group is displayed to ticket buyers and can be collapsed or expanded to show the ticket types that belong to that group.
Start by logging into your Quicket account, and go to Organiser Hub -> Manage Events then click on the name of your event. Then from the menu of your dashboard choose Checkout then Ticket groups .

Note that you'll need to create your ticket types before setting up ticket groups. You can do this by going to Checkout then Ticket types in your dashboard. Click here for help with additional ticket type settings.
Under Use ticket groups? slide to YES then click Add Ticket Group to start setting up your groups.
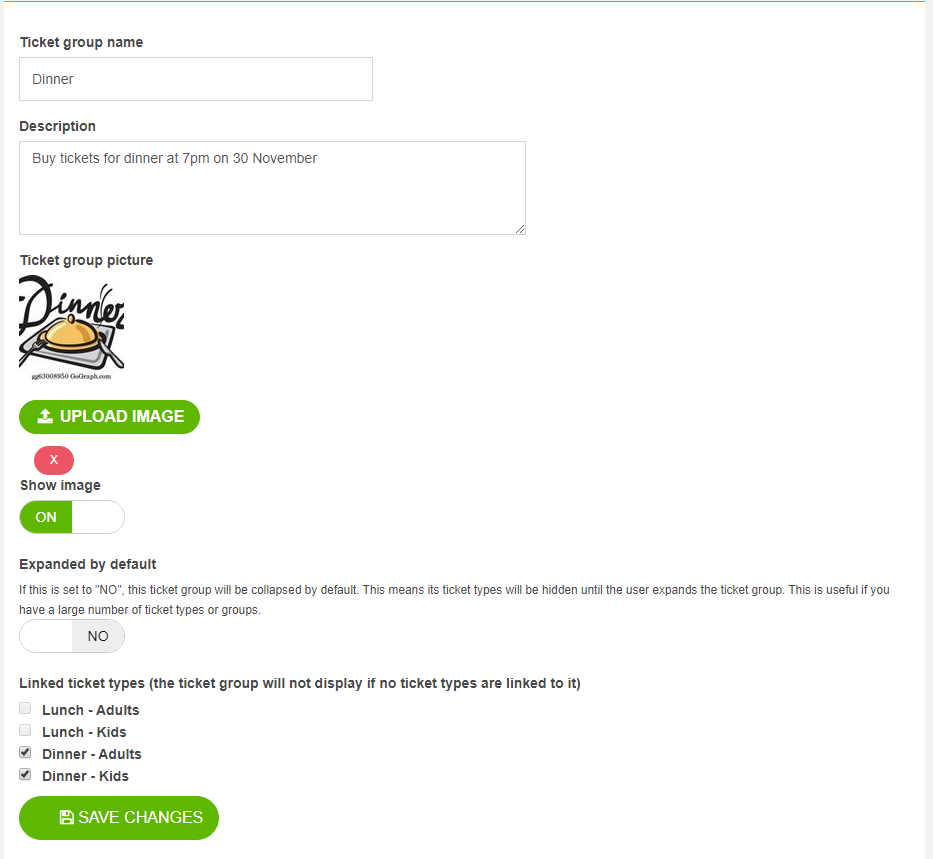
Ticket group name: let people know how you're categorising this group of tickets.
Description: let ticket buyers know what they can expect from the ticket types listed under this group. This will appear in smaller text under the ticket group name on your event page.
Ticket group picture: if you choose to provide one, this image will appear next to the ticket group name and description.
Show image: if switched OFF, the ticket group picture will not appear on the event page.
Expanded by default: if YES, ticket buyers will see every ticket type listed under every ticket group by default. If NO, then ticket buyers will need to click to expand the ticket type options listed within each group.
Linked ticket types: you'll need to select with of your ticket types will be listed under this ticket group. If no ticket types are selected, the group will not appear on the event page. Note that each ticket type can only be linked to one ticket group.
If you choose to have your ticket groups collapsed by default, the Choose Your Tickets section of your event page will look something like this:
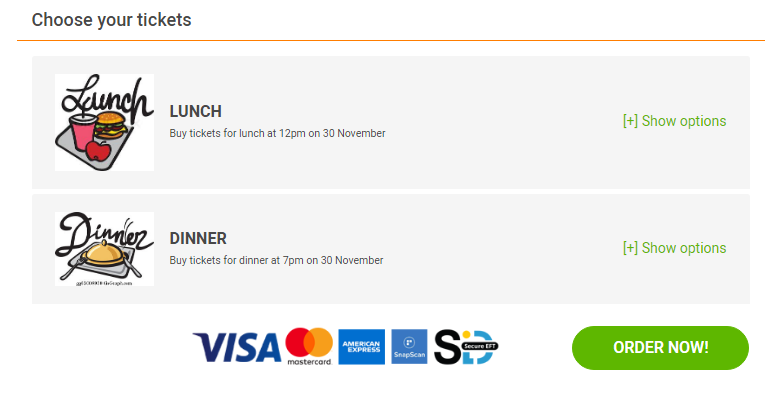
Ticket buyers will need to click Show options to see the ticket types they can book.
If you choose to expand your ticket groups by default, then your event page will look something like this:
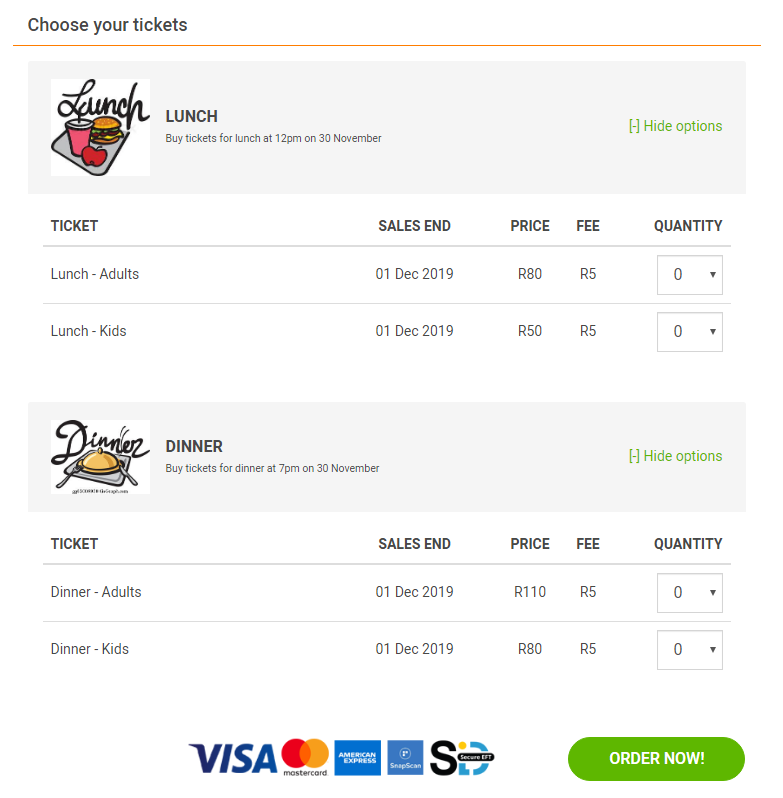
Ticket buyers will by default see every ticket type listed in the ticket group.
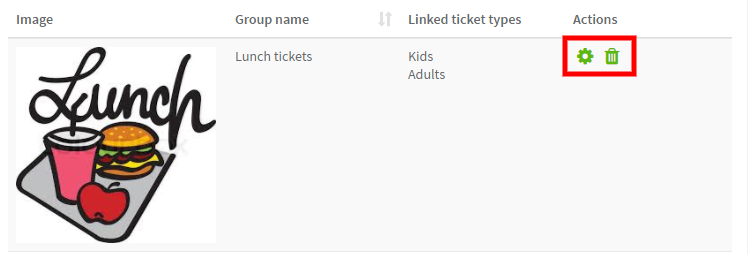
To edit the settings of your ticket groups, select the cog icon under Actions on the Ticket Groups page in your dashboard. If you need to remove a ticket group, click rubbish bin icon under Actions .
Start by logging into your Quicket account, and go to Organiser Hub -> Manage Events then click on the name of your event. Then from the menu of your dashboard choose Checkout then Ticket groups .
Note that you'll need to create your ticket types before setting up ticket groups. You can do this by going to Checkout then Ticket types in your dashboard. Click here for help with additional ticket type settings.
Under Use ticket groups? slide to YES then click Add Ticket Group to start setting up your groups.
Ticket group name: let people know how you're categorising this group of tickets.
Description: let ticket buyers know what they can expect from the ticket types listed under this group. This will appear in smaller text under the ticket group name on your event page.
Ticket group picture: if you choose to provide one, this image will appear next to the ticket group name and description.
Show image: if switched OFF, the ticket group picture will not appear on the event page.
Expanded by default: if YES, ticket buyers will see every ticket type listed under every ticket group by default. If NO, then ticket buyers will need to click to expand the ticket type options listed within each group.
Linked ticket types: you'll need to select with of your ticket types will be listed under this ticket group. If no ticket types are selected, the group will not appear on the event page. Note that each ticket type can only be linked to one ticket group.
If you choose to have your ticket groups collapsed by default, the Choose Your Tickets section of your event page will look something like this:
Ticket buyers will need to click Show options to see the ticket types they can book.
If you choose to expand your ticket groups by default, then your event page will look something like this:
Ticket buyers will by default see every ticket type listed in the ticket group.
To edit the settings of your ticket groups, select the cog icon under Actions on the Ticket Groups page in your dashboard. If you need to remove a ticket group, click rubbish bin icon under Actions .
Related Articles
How to add, edit and delete ticket types
To complete the event creation form, you need to create at least one ticket type, but you can add more ticket types, edit your current ticket types or delete ticket types from your event dashboard at any time after your event is created. Start by ...How to update your default ticket type settings
You're creating or managing the tickets for your event, and need to set your purchase limits, sales dates and ticket descriptions. You'll start creating your ticket types in Step 3 of event creation, but you can always edit these and add more ticket ...Create promotional codes to reveal discounts or hidden tickets
You can create promotional codes for guests to reveal hidden ticket types, to apply a discount on select tickets, or to offer guests a special discount for buying tickets in bulk. Start by logging into your Quicket account, and go to Organiser Hub -> ...How to send complimentary tickets
You may have guests who don't need to pay for tickets for your event. You can easily send complimentary tickets to guests right from your event dashboard. Comps are free for you to send and free for your guests to receive. Note that you can only ...How to buy a ticket using SnapScan
SnapScan is an app you can download on your smart phone to make payment by scanning a code. You can find out more about SnapScan here. Choose your tickets On the event page, click the TICKETS button and you'll see all of the ticket type options, the ...