How to send RSVPs to your event
If you have guests you'd like to send complimentary tickets to but want to first make sure they confirm attendance, simply send out RSVPs from your event dashboard and your guests can confirm or decline the invite.
Please note that RSVPs count toward your event capacity as well as individual ticket quantities; e.g. if you have an event capacity of 50 and send out 45 RSVPs, only 5 tickets will be available for sale on your event page. You can set an invitation expiry date to cancel and release unconfirmed tickets to avoid losing sales.
Start by logging into your Quicket account, and go to Organiser Hub -> My Events then click on the name of your event. Then from your dashboard menu select Guest Management->Send RSVP.
You'll have the option to select specific settings for your RSVPs.
Require ticket info:
if you have ticket information that is required for guests to fill out in addition to name and email, slide to YES and guests who accept the invitation will be required to fill out their ticket details before claiming their ticket.
Set expiry date:
slide to YES if you need to know if guests are attending before a certain date. If set to NO, guests will have until the date of the event to select whether they are attending and claim their ticket.
Custom description: if you'd like guests who are sent invitations to see an event description in their invite email that is different than the description you've listed on your event page, you can fill that in here.
Custom description: if you'd like guests who are sent invitations to see an event description in their invite email that is different than the description you've listed on your event page, you can fill that in here.
Next, you'll need to choose whether you're sending invitations to one person or to multiple people. If you're sending an invitation to just one person, you'll need to provide their first name, surname and email address.
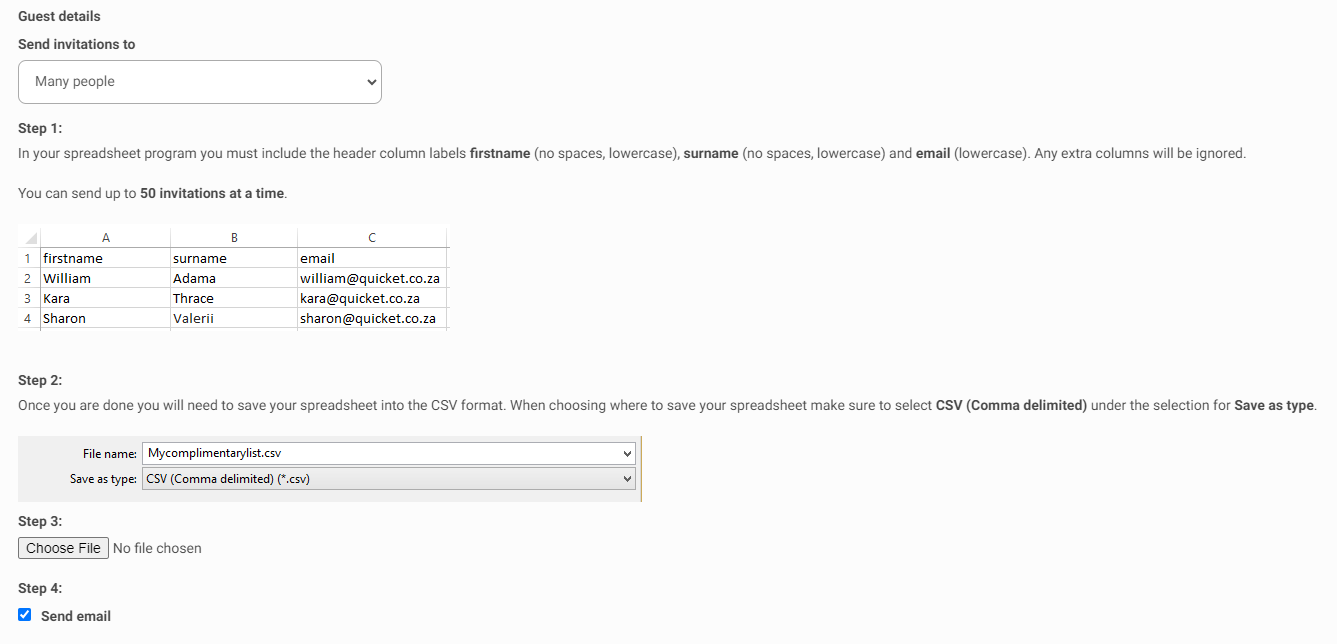
If you're sending RSVPs to multiple guests, you'll want to select Many people from the dropdown menu under Guest details.
If you only want the guest to appear on the guest list after confirming attendance without sending them a ticket email, you can un-tick
Send email.
Note that you can only issue 200 RSVPs per event in your Quicket account. If your event is recurring, you'll be able to issue 200 RSVPs per each event in the series. To issue more than 200 RSVPs, you'll need to create and link a Mandrill account to your Quicket account.
Click here for help linking your Mandrill account.

If you're sending RSVPs to multiple people, you'll need to create a spreadsheet of your guests, separating each column by first name, surname and email. Make sure there are no spaces or special characters in any fields, or you will receive an error when trying to upload the file. Save the file as a CSV (comma delimited) file, then upload the file under Step 3: Choose File.
If you're sending RSVPs to multiple people, you'll need to create a spreadsheet of your guests, separating each column by first name, surname and email. Make sure there are no spaces or special characters in any fields, or you will receive an error when trying to upload the file. Save the file as a CSV (comma delimited) file, then upload the file under Step 3: Choose File.
Choose ticket amounts
Next, you'll need to indicate which ticket(s) each guest who confirms attendance should receive and how many.
Enter the amount of tickets the guests should receive if they confirm attendance in the box under the ticket type you're sending them. You can send multiple ticket types to guests.
Note that if you're sending tickets to multiple people in a CSV file, they will each receive the same ticket type and the same amount of tickets should they confirm attendance.
Click
Send invites
when you're done, and Quicket will send an invitation email to the guests. When guests confirm they are attending the event, we will immediately send them the complimentary tickets you have chosen.
Related Articles
How to send more comps and RSVPs than Quicket's default limit
If you're planning to send more than 200 complimentary tickets or 200 RSVPs to your event, then you'll need to link a Mandrill account to your Quicket account. For help setting up your Mandrill account: ...How to create contact lists and send invitations
After you finish creating your event, you'll land on your event dashboard page where you can continue updating and editing your event as much as you'd like. Once you've gone Live and your event is listed as Active you'll be able to send invitations ...How to contact your guests via SMS
Use the SMS Your Guests feature to quickly send info to any of your guests that provided a mobile phone number at checkout. Note that each SMS costs R0.25 ex VAT. This feature is not available for free events or events that have not yet turned over ...How to set up an incentive for guests to promote your event
You want to encourage your guests to promote your event and get the word out to a wider network of people. All it takes is a little incentive. Set up an incentive Start by logging into your Quicket account, and go to Organiser Hub -> My Events then ...Get to know your event dashboard and menu
Your event dashboard is the hub from which you'll find all the elements needed to manage your event on Quicket. Spending even just a couple minutes clicking through your dashboard and getting familiar with it can unlock so much potential for ...