Create promotional codes to reveal discounts or hidden tickets
You can create promotional codes for guests to reveal hidden ticket types, to apply a discount on select tickets, or to offer guests a special discount for buying tickets in bulk.
Start by logging into your Quicket account, and go to Organiser Hub -> My Events and click on the name of your event. From your dashboard menu, choose Marketing and then Promotional Codes.
Start by logging into your Quicket account, and go to Organiser Hub -> My Events and click on the name of your event. From your dashboard menu, choose Marketing and then Promotional Codes.
Browse to the bottom of the screen and click Add New Code.
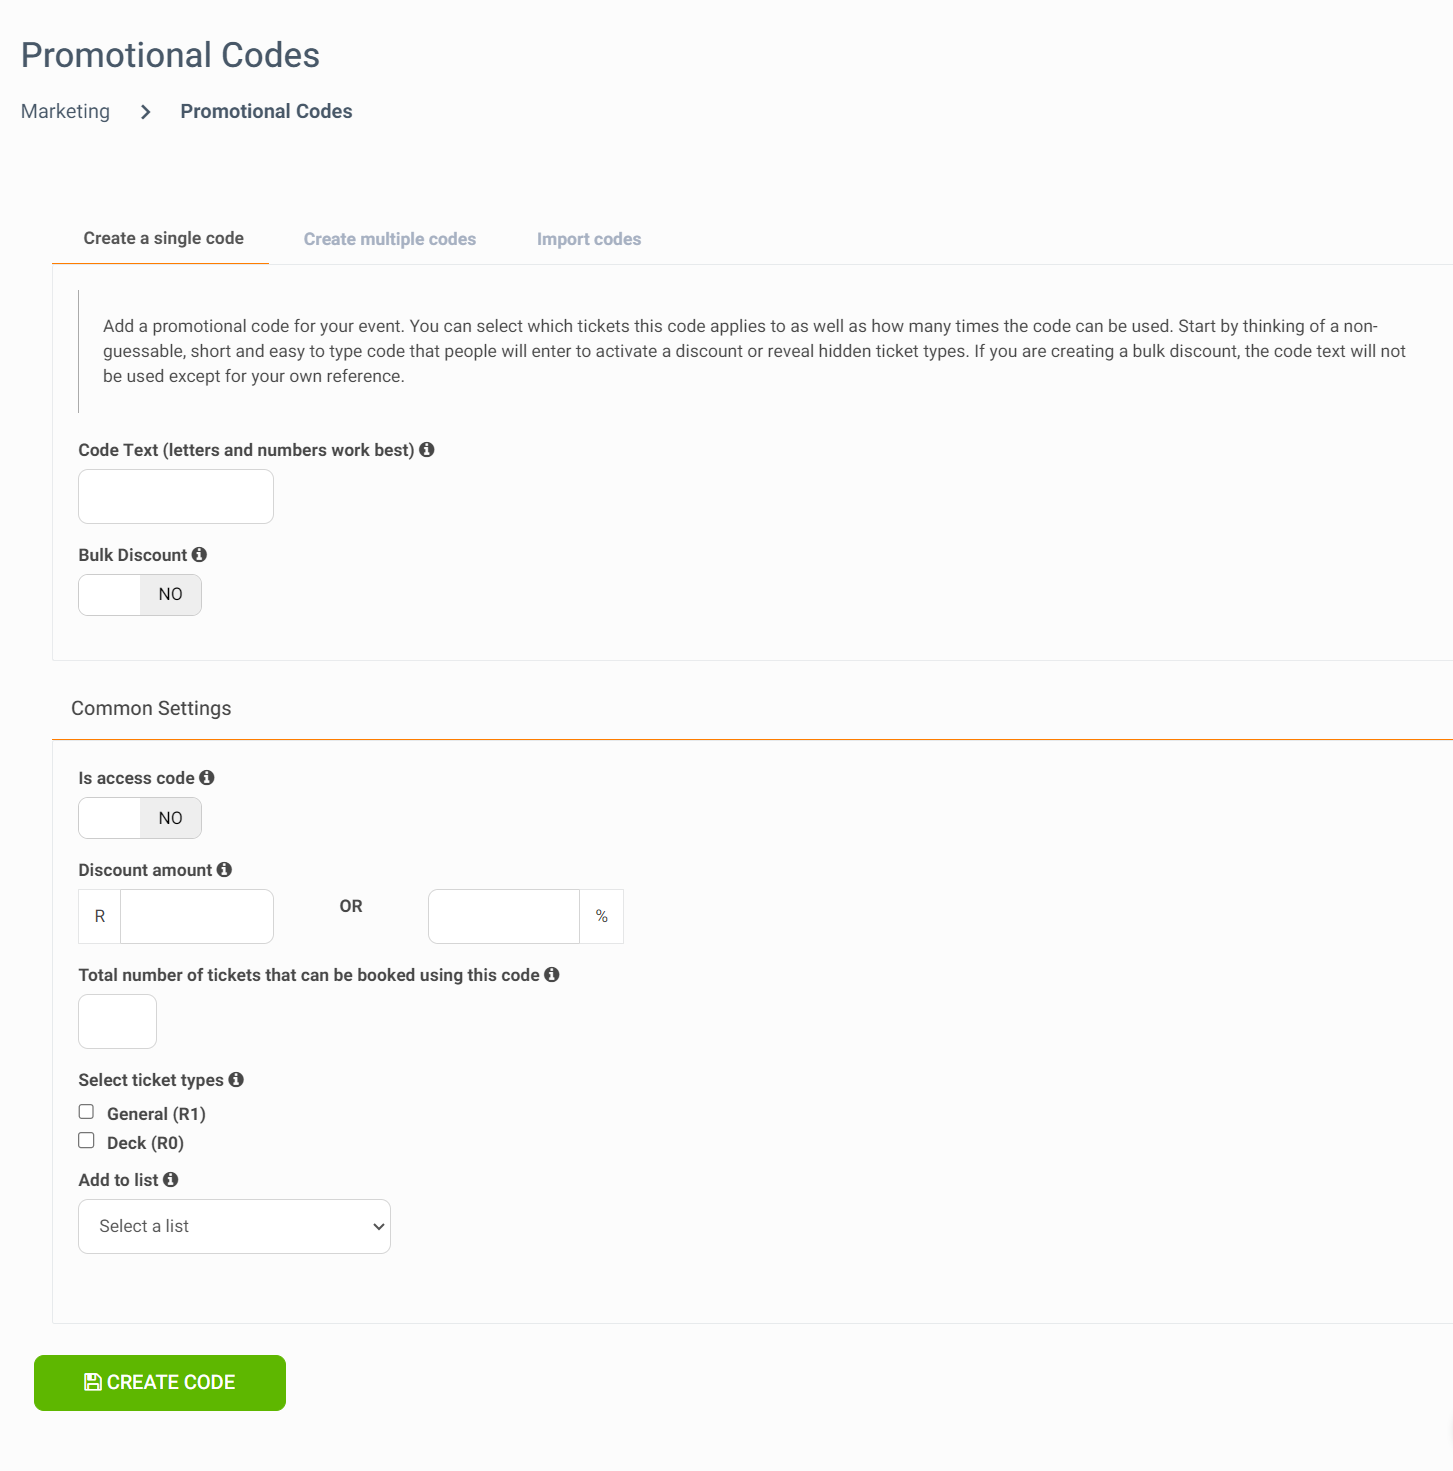
You can create a single code with multiple uses that can apply to as many of your ticket types as you'd like.

Code text: enter the code that guests will need to use to receive their discount or reveal hidden ticket types. Try using something short and easy to type but that would also be hard to guess.
Code text: enter the code that guests will need to use to receive their discount or reveal hidden ticket types. Try using something short and easy to type but that would also be hard to guess.
Bulk discount:
set a discount based on the amount of tickets being ordered.
See the help article on bulk discounts for more information.
Is it an access code?:
slide to YES if you would like this code to reveal hidden ticket types you have created. (Scroll down below to see help hiding your ticket types.)
Discount amount: if you're creating a code that should apply a discount to the guest's purchase, you'll want to specify the monetary amount discounted or the percentage to be discounted under Discount amount. Guests will be able to see the discounted amount after they enter their code and click Apply on the event page.
Discount amount: if you're creating a code that should apply a discount to the guest's purchase, you'll want to specify the monetary amount discounted or the percentage to be discounted under Discount amount. Guests will be able to see the discounted amount after they enter their code and click Apply on the event page.
Note that you can make tickets that are both discounted and hidden by checking
Is access code
as well as entering a discount value. When guests enter the code on the event page, the hidden ticket type will appear with the discount applied.
Number of uses:
the total number of tickets that can be ordered using the code you've created.
Select tickets:
select which ticket types you'd like this code to apply to.
If you don't select any tickets, this code will not apply a discount or reveal hidden ticket types.
Add to list: you can create lists to group your codes for ease of reference later on. E.g. if you have a special discount for sponsors, you can create a Sponsors list to keep track of all the codes you have made available to sponsors.
Click
Create Code
, and you’re done!

Add to list: you can create lists to group your codes for ease of reference later on. E.g. if you have a special discount for sponsors, you can create a Sponsors list to keep track of all the codes you have made available to sponsors.
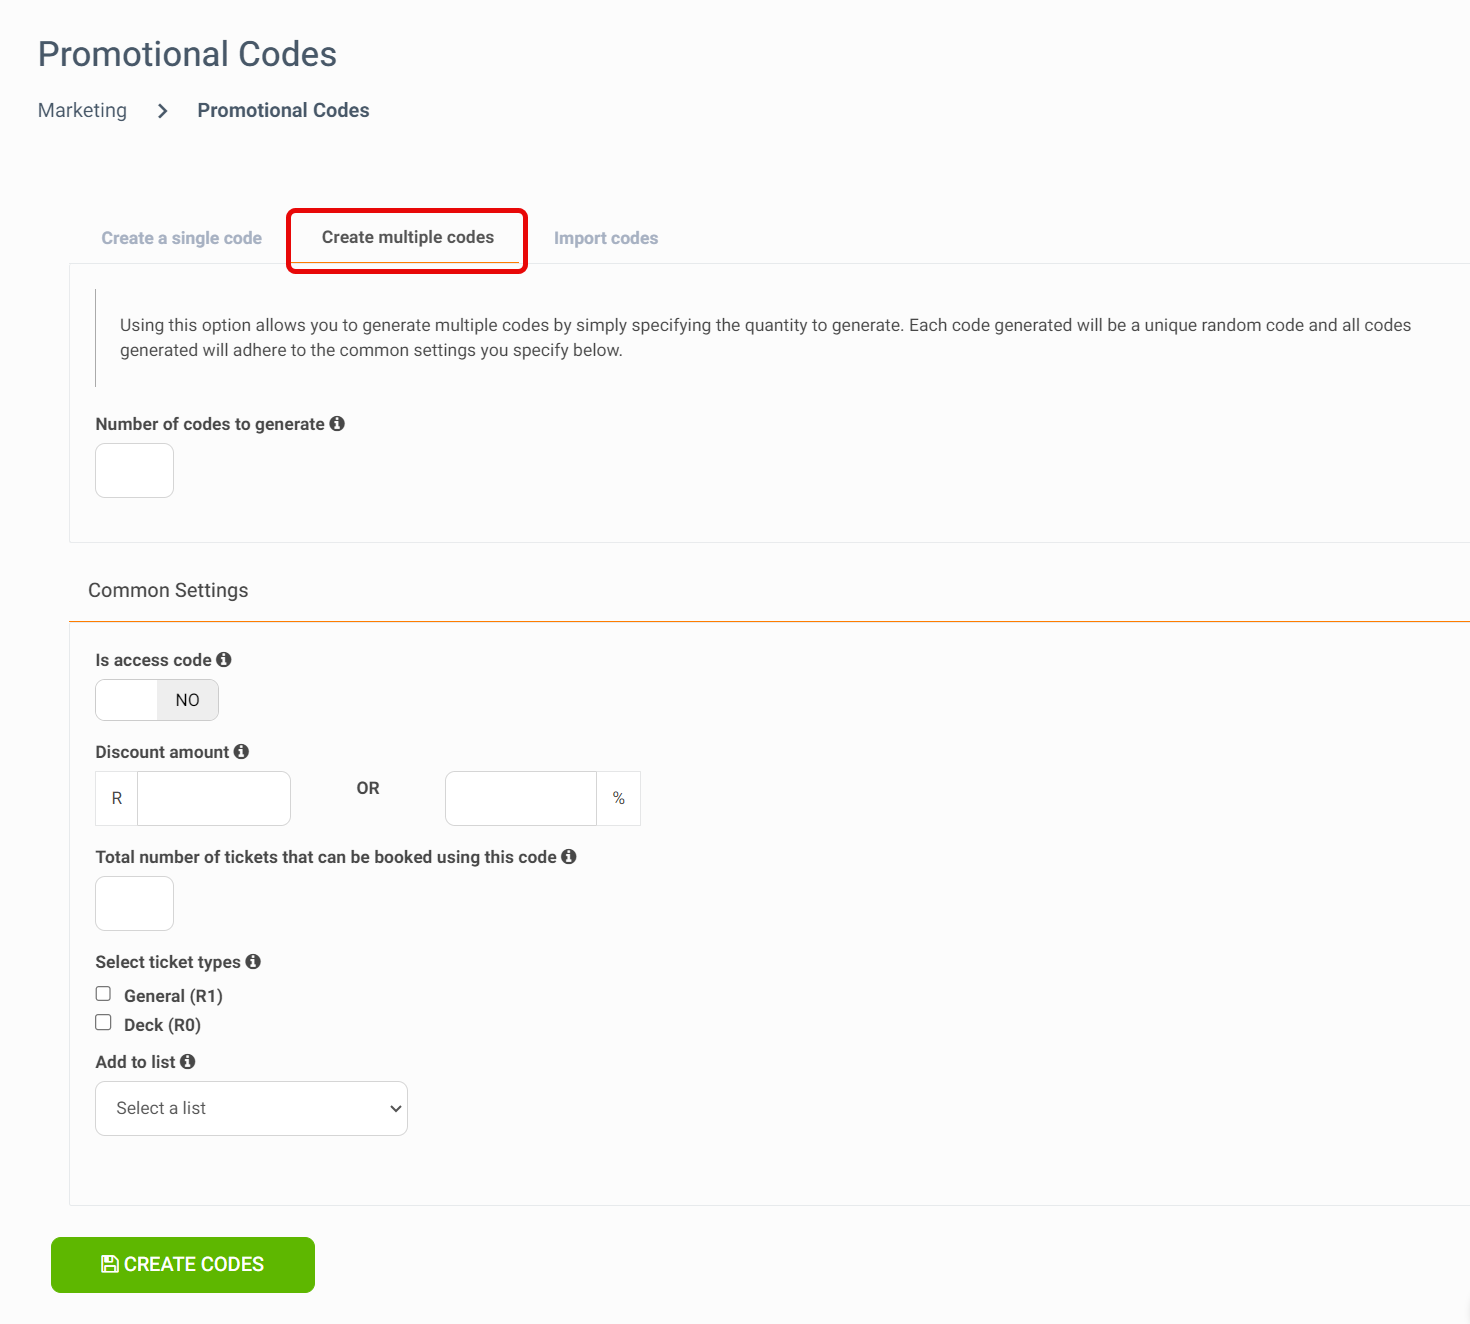
Create multiple codes
You can generate multiple random codes that you can send to guests. Note that the Common Settings will apply to each of the codes generated.
Number of codes to generate: Enter how many codes you need to create.
Is it an access code?:
slide to YES if you would like this code to reveal hidden ticket types you have created. (Scroll down below to see help hiding your ticket types.)
Discount amount: if you're creating a code that should apply a discount to the guest's purchase, you'll want to specify the monetary amount discounted or the percentage to be discounted under Discount amount. Guests will be able to see the discounted amount after they enter their code and click Apply on the event page.
Discount amount: if you're creating a code that should apply a discount to the guest's purchase, you'll want to specify the monetary amount discounted or the percentage to be discounted under Discount amount. Guests will be able to see the discounted amount after they enter their code and click Apply on the event page.
Note that you can make tickets that are both discounted and hidden by checking Is access code
as well as entering a discount value. When guests enter the code on the event page, the hidden ticket type will appear with the discount applied.
Number of uses:
the number of tickets that each code can be used for. E.g. if you are generating 50 codes to give to 100 people for 2 tickets each, you should enter the number 2 here.
Select tickets:
select which ticket types you'd like this code to apply to.
If you don't select any tickets, this code will not apply a discount or reveal hidden ticket types.
Add to list: you can create lists to group your codes for ease of reference later on. E.g. if you have a special discount for sponsors, you can create a Sponsors list to keep track of all the codes you have made available to sponsors.
Click
Create Codes, and you’re done!
Import codes
If you've created your own promotional codes, you can import them as a CSV file.
Create a CSV file, with the headers fields: code, numuses and listname. If numuses (the number of tickets that can be booked for each code) and listname are also specified under Common Settings on this page, the settings in your CSV file will take precedent.
Is it an access code?:
slide to YES if you would like this code to reveal hidden ticket types you have created. (Scroll down below to see help hiding your ticket types.)
Discount amount: if you're creating a code that should apply a discount to the guest's purchase, you'll want to specify the monetary amount discounted or the percentage to be discounted under Discount amount. Guests will be able to see the discounted amount after they enter their code and click Apply on the event page.
Discount amount: if you're creating a code that should apply a discount to the guest's purchase, you'll want to specify the monetary amount discounted or the percentage to be discounted under Discount amount. Guests will be able to see the discounted amount after they enter their code and click Apply on the event page.
Note that you can make tickets that are both discounted and hidden by checking Is access code
as well as entering a discount value. When guests enter the code on the event page, the hidden ticket type will appear with the discount applied.
Number of uses:
the number of tickets that each code can be used for. E.g. if you are generating 50 codes to give to 100 people for 2 tickets each, you should enter the number 2 here.
Select tickets:
select which ticket types you'd like this code to apply to.
If you don't select any tickets, this code will not apply a discount or reveal hidden ticket types.
Add to list: you can create lists to group your codes for ease of reference later on. E.g. if you have a special discount for sponsors, you can create a Sponsors list to keep track of all the codes you have made available to sponsors.
Click
Create Codes
, and you’re done!
Download lists

Note that you will not be able to delete a code if it has already been used.

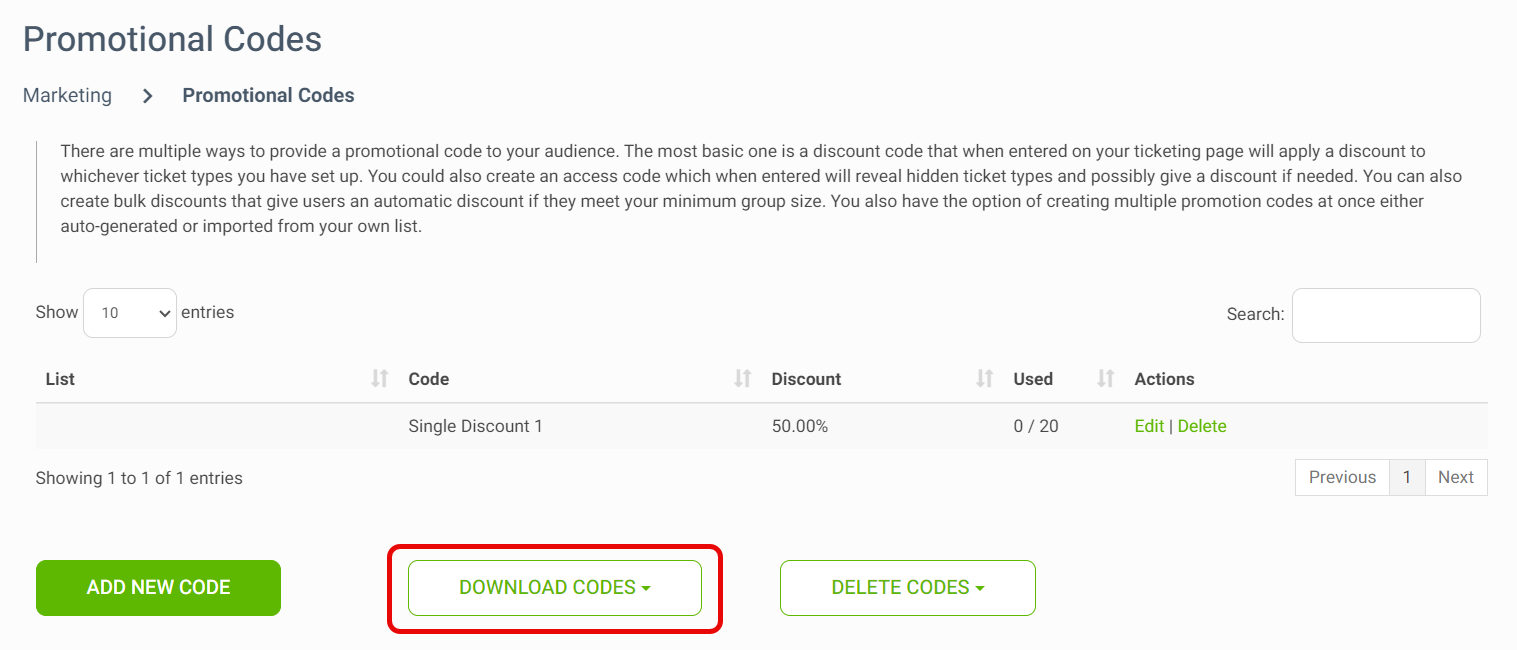
Download lists
If you've created lists, you can download each one individually or download all of them together for a breakdown of your codes.
See the settings you've created for each code as well as how many times each code has been used. Codes that are currently in use are codes that have already been used to book tickets or codes that have just been applied for an order in progress.
See the settings you've created for each code as well as how many times each code has been used. Codes that are currently in use are codes that have already been used to book tickets or codes that have just been applied for an order in progress.
Delete a code
If you no longer need a code that you've created, you can simply delete it from your Promotional Codes list. Under Actions, simply click Delete or click the Delete Codes button.Note that you will not be able to delete a code if it has already been used.
Hiding ticket types for access codes
To hide tickets for your event, go to Manage Checkout
then
Ticket Types
from the menu of your event dashboard. Click the three-dotted menu under the Actions heading click the eye icon next to the ticket type you'd like to hide. Once you've done this, only guests with the access code will be able to order this ticket from the event page.
Related Articles
How to set up a discount for bulk ticket orders
Bulk discount codes differ from normal promotion codes in that a bulk discount has unlimited uses, and the customer does not need to enter the code name to receive the discount. All they must do is select the amount of tickets that you've set as the ...How to apply a discount or access code
If you were given an access code or discount code to use to purchase tickets, just start by going to the event page on Quicket where you'll need to apply your code. You can find all publicly listed events by using the search bar on our homepage, or ...How to update your default ticket type settings
You're creating or managing the tickets for your event, and need to set your purchase limits, sales dates and ticket descriptions. You'll start creating your ticket types in Step 3 of event creation, but you can always edit these and add more ticket ...How to add, edit and delete ticket types
To complete the event creation form, you need to create at least one ticket type, but you can add more ticket types, edit your current ticket types or delete ticket types from your event dashboard at any time after your event is created. Start by ...The event page says my code has already been used
If you selected tickets on the event page and clicked Order Now then closed the page, hit back in your browser or had a failed purchase attempt, you'll see the message 'Promotion code has already been used'. Quicket has marked your code or ticket ...